Java Spring Development Journey

Spring Framework

Having worked in my current role for about 8 months, I have realized that to be a lynchpin, I need to understand Java programming, especially using Spring Framework and Angular front-end. Towards this end, I've spent a lot of my time and energy learning and honing this skill.
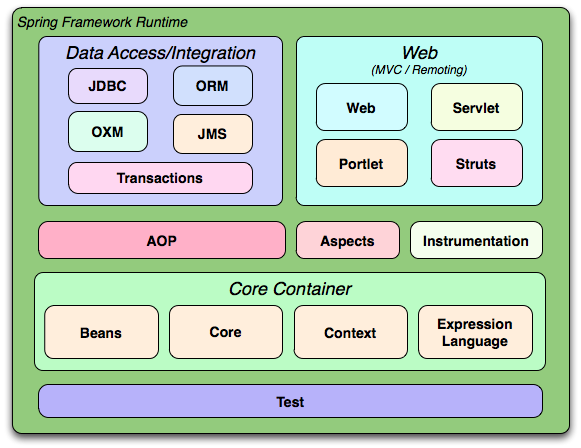
Spring Framework

Spring MVC - Model-View-Controller:
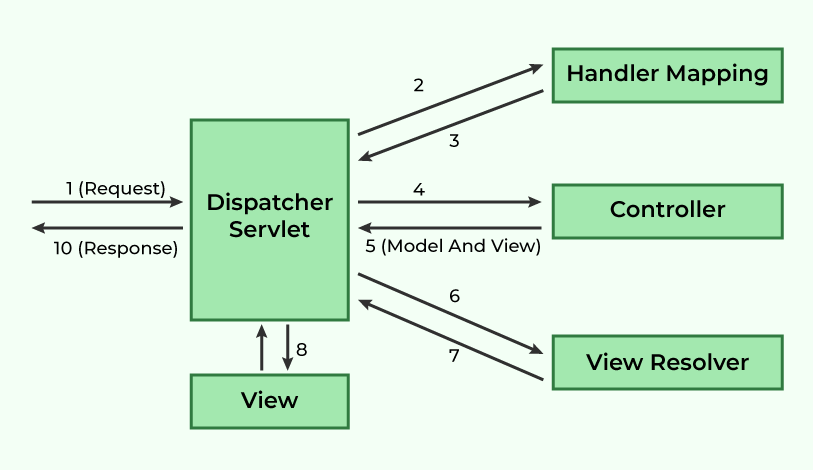
Spring MVC

Spring implements a Model-View-Controller (MVC) pattern which is a software architectural pattern that separates an application into 3 interconnected components. This separation helps manage complexity & promotes organized coding.
  1. Model: Represents the data and the business logic of the application. It is responsible for retrieving data from databases, encapsulating it, and defining the business operations.
  2. View: This is the user interface of the application. It displays the data from the Model to the user and also sends user commands to the Controller.
  3. Controller: Acts as an intermediary between View and Model. It receives user input from the View, processes it (often with the help of Model objects), and returns the output display data to the View.

In Spring, the above 3 items are implemented as follows:

  1. Model: Typically implemented using plain old Java objects (POJOs) and Spring services.
  2. View: Often realized through JSPs, Thymeleaf templates, or other templating engines that render the UI. In very basic development, just HTML pages can also be utilized.
  3. Controller: Spring MVC controllers are annotated classes (with @Controller) that handle HTTP requests and responses. Can also be @RestController.

Model (user.java)

public class User {

    private String name;

    private int age;

    // Constructors, getters, setters

}

Controller (UserController.java)
import org.springframework.stereotype.Controller;
import org.springframework.ui.Model;
import org.springframework.web.bind.annotation.GetMapping;

@Controller
public class UserController {

    @GetMapping("/users")
    public String showUsers(Model model) {
        List<User> users = getUsersFromService(); // Assuming this method fetches users
        model.addAttribute("users", users);
        return "users"; // Name of the view (users.jsp or users.html)
    }

    // Method to fetch users
    private List<User> getUsersFromService() {
        // Fetch users from a service or directly from DB (for simplicity)
        return Arrays.asList(new User("Alice", 30), new User("Bob", 35));
    }
}

View (users.html)
<!DOCTYPE html>
<html>
<head>
    <title>Users</title>
</head>
<body>
    <h2>Users</h2>
    <ul>
        <c:forEach var="user" items="${users}">
            <li>${user.name} - ${user.age}</li>
        </c:forEach>
    </ul>
</body>
</html>


Inversion of Control (IoC) and Dependency Injection: 

Inversion of Control is a design principle where the control of objects or portions of a program is transferred to a container or framework. It's about inverting the flow of control compared to traditional programming methods, where the custom code makes the decisions and controls the flow of execution.

In the context of Spring, IoC means that the Spring Framework takes control of creating and managing the life cycle and configuration of application objects (beans). Instead of the application code directly instantiating or locating necessary services, Spring container does it.

Dependency Injection is a design pattern used to implement IoC. It allows a system to be more decoupled and modular by removing the dependency that a class might have on a specific implementation of an interface. In DI, dependencies (services, clients, etc.) are injected into objects (beans) by the container, rather than being hard-coded.

There are several methods of DI:

  1. Constructor Injection: Dependencies are provided through a class constructor.
  2. Setter Injection: The container injects dependencies through setter methods.
  3. Field Injection: The container injects dependencies directly into annotated fields.

Without IoC and DI:

public class MyApplication {
    private MyService service = new MyServiceImpl(); // Directly creating the dependency

    public void process() {
        service.performAction(); // Using the dependency
    }

}

In this example, MyApplication is directly creating and managing the instance of MyService. This is a tight coupling and makes testing and maintenance harder.

With Inversion of Control:
public class MyService {
    private MyRepository repository = new MyRepository();
    // MyRepository is directly instantiated within the class.
}


Using Dependency Injection:
@Component
public class MyService {
    private MyRepository repository;

    @Autowired
    public MyService(MyRepository repository) {
        this.repository = repository;
        // MyRepository is injected by Spring
    }
}

In the above example, MyService doesn’t instantiate MyRepository directly. Instead, it declares a dependency on MyRepository (using constructor injection), and Spring injects this dependency when MyService is created. This makes MyService easier to test and maintain, as it's not tightly coupled to a specific implementation of MyRepository.


Putting it all together - Developing a web app with Spring

1. Setting Up the Development Environment

- **Install Java Development Kit (JDK):** Download and install the latest version of JDK.
- **Choose an IDE:** Select an Integrated Development Environment (IDE) such as IntelliJ IDEA, Eclipse, or Spring Tool Suite (STS).
- **Install Maven or Gradle:** These are build tools used for managing dependencies and building your project.

2. Initialize the Spring Boot Project

- **Use Spring Initializr:** Go to (https://start.spring.io/) to generate a Spring Boot project. Choose your Maven/Gradle, Java version, and dependencies like Spring Web, Thymeleaf, Spring Data JPA, and Spring Security.
- **Download and Extract:** Download the generated ZIP file and extract it to your workspace.
- **Import the Project:** Open your IDE and import the project.

3. Project Structure Setup

- **Package Structure:** Organize your Java classes into packages (e.g., `controller`, `service`, `repository`, `model`, `config`).
- **Application Properties:** Configure application settings in `application.properties` or `application.yml`.

4. Database Configuration

- **Choose a Database:** Decide on a database (e.g., MySQL, PostgreSQL, H2). For development purposes, you can use an in-memory database like H2.
- **Configure Database:** Set up database configurations in your `application.properties` file.

5. Building the Model

- **Create Entity Classes:** Define your entity classes in the `model` package, annotated with `@Entity`.
- **Repository Interfaces:** Create repository interfaces in the `repository` package for data access, extending `JpaRepository` or `CrudRepository`.

6. Creating the Web Layer

- **Controller Classes:** Develop controllers in the `controller` package, annotated with `@Controller` or `@RestController`, to handle HTTP requests.
- **Service Layer:** Implement service classes in the `service` package to handle business logic.
- **View Templates:** If you're using Thymeleaf or similar, create HTML templates in the `resources/templates` directory.

7. Implementing Business Logic

- **Service Methods:** Write methods in service classes to perform business operations.
- **Use Dependency Injection:** Autowire services into controllers using `@Autowired`.

8. Security Configuration

- **Spring Security:** If needed, add Spring Security for authentication and authorization.
- **Configure Security:** Write a security configuration class extending `WebSecurityConfigurerAdapter`.

9. Testing Your Application

- **Unit Tests:** Write unit tests for your services and repositories.
- **Integration Tests:** Create integration tests for your controllers.

10. Application Properties and Profiles

- **Externalize Configuration:** Use `application.properties` or `application.yml` for externalized configuration.
- **Profiles:** Set up different profiles for development, test, and production.

11. Logging

- **Configure Logging:** Set up logging using SLF4J with Logback or Log4J2.

12. API Documentation (If Creating REST API)

- **Swagger:** Integrate Swagger for API documentation if you're creating a RESTful service.

13. Building and Running the Application

- **Run Locally:** Use your IDE or the command line (`mvn spring-boot:run` or `gradle bootRun`) to run your application.
- **Build Artifact:** Create a JAR or WAR file for deployment.

14. Deployment

- **Choose a Platform:** Deploy your application to a suitable platform, such as AWS, Azure, Heroku, or a local server.

15. Monitoring and Maintenance

- **Monitor Application:** Use tools like Spring Actuator, Prometheus, and Grafana for monitoring.
- **Maintain and Update:** Regularly update dependencies and refine the application based on feedback.

Thank you for reading this post! :)

Sources:

[1] https://docs.spring.io/spring-framework/reference/index.html
[2] Spring in Action by Craig Walls
[3] ChatGPT

Comments

Popular posts from this blog

Playing around with Dell R520 server

Experience Interviewing for an Infrastructure Engineer - Continuous Delivery position

2023 Summer Reading List Summary